
We’d first seen a seedball making machine on youtube in a video which, sadly, I’ve not been able to find again. There are quite a few other videos out there but it was really the only one that showed how it had been made from start to finish, including the seedball scoop. I really liked the idea of a machine (especially after making 600 of the buggers by hand) and it seemed like a fun construction project.

My first sketch of the machine (to the right) was pretty much from memory of the original video we saw. It consisted of basically;
- A table on which small wheels were mounted upwards
- A large barrel with two open ends, mounted on the wheels to turn
- A belt going down to a roller below the table
- A second belt going to the power source of the machine, in this case a (badly drawn) bicycle, but a motor in the original. (We had an old dead bicycle carcass (2 flat tires and a bent rim) given to us for free. Check your local areas for bike exchanges or friends wanting to get rid of old bikes. It’s usually easy to find something useable.)
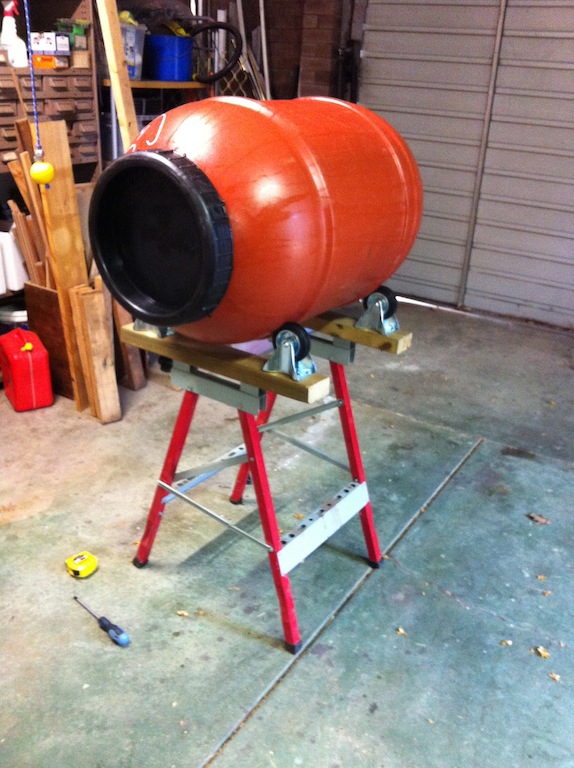
My thought was that the bicycle could easily be swapped out with a motor at a later date if we felt we wanted to do that. The core of the machine is an old olive barrel. It’s perfect in that it’s robust, large and already has a curving lip at the top and the bottom should you choose to cut these off. Ensuring that your mixture stays in the barrel with minimal fuss. It’s a 190 litre barrel and cost us $20 from a local person selling them off.


Do make sure to place your wheels and check that your barrel clears the wooden rails before attaching them, or there shall be embarrassment later. Also make sure that your wheels are aligned both side to side and longways or your barrel will sit crookedly and bounce/jostle while it turns. Here is a shot of what your creation should look like if all goes well.The barrel will turn easily and smoothly at this point with no jumping or sticking.

In order to run the string/belt we removed the rear tire of the bike so the string could fit in the groove where the tire normally goes. This worked well and seems to be impossible to get to “jump” out through abuse.

We then used two angled D bolts to go around the swingarm and through (outwards) the two uprights. Securing these in place with washers and nuts. Make sure your uprights are tall enough to hold the wheel a good 6-10 CM clear of the base board when bolted on. Next we used our test bit of string from the wheel to the barrel to give it a go: SUCCESS!
The string actually worked surprisingly well. It was a slightly stretchy string, almost elastic, and very cheap from Bunnings. ($8 for 10 meters). It worked so well in fact that I, with much sadness, pushed aside the (rather expensive) rubber belt I had bought and decided to just stick with the string as the belt was quite wide and did not sit well in the bicycles wheel groove.
After this there was just the business of getting the bike level and comfy to ride. For this we simply built an upside down “T” shape out of wood that just fit between the front forks of the bike with the wheel off. Next we drilled a hole right through the top of the post at the right height and ran a long bolt through it that would fit into the axle slots on the front fork. Finally we mounted the frot forks on this and added washers and a nut to clamp it down solidly.
Viola! A finished seed ball machine.

I’m looking forward to “giving it a spin” as it were. Total cost breakdown was as follows.
- Bike: Donated, free
- Wood: recycled scrap, free
- Trolly Wheels: Bought at hardware store, 4 x $19
- Barrel: Bought via local second hand, $20
- Rope: Bought at local hardware store, $8
Grand total? : $104
And you could easily get that down by using old trolly wheels on the base from somewhere. The only addition I intend on making to the machine so far is to get one of those “no slip” bath mats and wrap it around the barrel to give the rope a slightly better purchase. It works fine as it is but you have to accelerate up at a steady pace. It can sometimes slip if you put too much sudden power into it. I’m also considering a thicker rope, but it depends on how well the current one does.
The only other suggestion I’ve had (which was genius) relates to the fact that I have an old “Magic Pie” Electric bicycle wheel lying around from when I used an electric Bike. A friend pointed out that if I wanted to safely and quickly “be lazy” I could simply pop the rear wheel off the bike and replace it with the Magic Pie electric wheel. It’s a 2kw wheel and runs off a battery pack. It’s PLENTY powerful enough to spin the barrel for hours and even has a “cruise control” button, so we could get it to a speed we like and lock it there. No muss, no fuss! So if we find peddling gets too tiring we can charge the battery up via solar and let the sun do our work for us. 🙂